I am going to be talking mostly about “substitution” during this iteration of the series. Replacing a buckle that is not working out with a better buckle for a specific intended purpose for example. And, of course, I will illustrate my points with the visual aids in the attached pictures. We will start by talking about the Belt, Individual Equipment, also known as a Web Belt, or more commonly as the Pistol Belt. For almost 100 years, some version of the Pistol Belt was a key component – the indispensable chassis – of successive officially fielded load carriage systems. Today, that is no longer the case. It has now been relegatedalmost entirely to ceremonial duties. Color Guards and such. If anyone in any kind of deployable unit has been issued a pistol belt as part of their standard field gear in the last few years, I would be very surprised.
While the Pistol Belt has largely become tactically irrelevant, it still serves as a textbook case to illustrate how tactical gear tends to slowly evolve over time – and often component by component. I pulled the picture of the belts, above left, off the web. It is not a complete history. There were other variants in between (some I will mention) but, it is a good representation of70 years of evolution. Starting from the top, the first belt (1), is the M1936 version. As the designation indicates, it was “type classified” as standard in 1936. The example above was produced in late WWII or post war since it is OD Green. Prior to mid-war, gear was generally a more tannish “khaki” color. There are a couple of elements or components of the M1936 belt I want to highlight. First is that the cotton webbing has a “horizontal weave” and the belt only adjusts on one side. The female buckle on the wearers’ left side is fixed. The length of the belt is adjusted with an end hook attachment along with the centerline eyelets. And, there are two metal “web retainers” to keep the folded webbing layers from separating.
The male buckle on the M1936 is a T-bar. Releasing the belt was a two-handed operation. Readers who remember the first few minutes of the Normandy landing in Saving Private Ryan will remember a scene with soldiers in the water trying frantically – and unsuccessfully – to release their web gear before drowning. That outcome is indeed based on real events. A number of soldiers, including paratroopers who landed in water obstacles far inland, drowned with their heavy gear on and still buckled. Therefore, one of the things that the developers of the M1956 system wanted to do was make it easier to unhook the pistol belt under stress. Therefore, the male buckle specifically was reduced from a T to something that looks like a small saddle horn. Moreover, while it kept the same end hook system, the M1956 belts could be adjusted for length on both sides with dual web retainers on either side as well.
I know from personal experience that the M1956 buckle can be opened with one hand. But it can only be done one handed if the buckle is not under tension. Otherwise, it is still a two-handed drill. Between (1) and (2) above, there is a missing version. The first iteration of the M1956 belt still had the horizontal weave webbing of the M1936. By the way, while not as durable as the later versions, the horizontal weave M1956 is the most comfortable of all the pistol belts if worn as a stand-alone gun belt. However, the majority of the M1956 belts – and all the subsequent belt versions – were produced with the tougher “vertical weave” configuration. In 1961 several revisions were made to the M1956 system. The universal ammunition pouches and buttpacks were reworked based on soldier feedback and the “Davis Buckle” (3) was first introduced.
A good number of cotton web M1956 belts were produced with the Davis Buckle. The buckle was the first true one-handed release. However, it had an unfortunate tendency to self-release any time it was not under tension. Therefore, it was not suitable for habitually loose fitting LCE/LBE in the field. It did look good for parade and ceremonial purposes, and Davis Buckle equipped belts ended up around the middles of many a Color Guard over the years. I suspect there are still some being used for that purpose still today. The Davis Buckle had a brief comeback with the limited fielding of the M1967 first generation of nylon gear (3). However, by the time that the ALICE LCE was fielded in 1974, the decision had been made to go back to the original M1956 buckle (4). Side note: As can be seen from the pictures above (belts 3 & 4), the early nylon OD web belts had a tendency to true reddish with time and use. A flaw in the dye process I suppose. Later versions did not seem to have that problem.
The post-Vietnam ALICE issue belt (4) did away with the middle row of eyelets and the end hooks. Instead, an alligator clip was added on each end, along with the familiar dual web retainers on either side. Sometime in the early 80s, the buckle for the ALICE belt was changed to a completely new plastic version (5). It was also a true one-handed release like the Davis Buckle. Oddly enough, long before the term “foliage green” had entered the camouflage color lexicon, the buckle was a greenish gray color. Otherwise, the belt did not change. There are also two interim belt variants between belts 5 and 6 above. Thosebelts were both OD Green, the first had the ALICE plastic buckle (5), the second had the large black side release buckle. Both with the web tab closure of the bottom foliage green version shown above (6). As far as I know, number 6 will likelybe the final standard Pistol Belt – as we have known them – in the system.
There is a lot of detailed history that I skipped over because it is not relevant to the subject at hand. The point is that the US Military tinkered with the Pistol Belt constantly over its service life. Making small, incremental changes, component by component. I recommend that if you are thinking about hacking some personal gear it is wise to assess the item by component first. Now, it could be that an item does not suit one’s purposes in its entirety. In that case, look for something completely different. But it is more likely, that only one or two elements of the gear is actually the source of the problem. I always try to isolate the issue and only address the specific problem. If nothing else, that methodology should save some time and effort.
Again, take the pistol belt for example. Those that I have hacked over the years are on the right in the picture above. I was issuedthe ALICE versions (4&5) but never liked them – with either the metal or plastic buckle. When adjusted (loosely) to my size and comfort, the alligator clip end adjusters always seemed to be in the way. They seemed to invariably end up somewhere that I wanted to attach a pouch or wire hanger system item like a holster. So, I continued to use the M1956 or the M1967 beltswith the centerline eyelets and hooks as a better alternative (7).Even on the M1956, instead of only 2 web retainers, I preferred 3 per side (see red triangles on belt 7) to keep the belt from separating. The red circle (above) shows how the middle retainer could be moved between the slide fasteners – that only hook onto the outer layer of the belt – on the ALICE ammo pouch to lock the two sides of the belt together. And it was easy enough to scrounge up some spares to add the additional retainers.
For a time, I used some commercial “Enhanced Pistol Belts” (9&10). Most of them had some version of web tab closures and were lined with Velcro. The biggest difference between them and issue belts is that they do not have perimeter eyelets and could not carry M1910 wire hanger items. They also came with a 3-button plastic buckle that some people like (blue circle above). I am not one of those people. So, I popped those off and put on the black side release buckles that the last generation of issue Pistol Belts came with (9). As I have already mentioned, those issue belts had the web tab closures on the free running ends. Unfortunately, they also had another version of the alligator clip – first seen on the ALICE belts – this time near the buckles (6). I routinely pop off those metal clips and add a salvaged web tab or two instead (8). Finally, since I mentioned it, I have displayed one ceremonial belt (12). There are versions with the “This We’ll Defend” emblem that are associated with Army Drill Sergeants and others with the EGA worn by USMC Drill Instructors. I wore an unmarked one like 12 when I had the honor of participating in funeral ceremonies at the National Memorial Cemetery of the Pacific at the Punchbowl on Oahu in the early 80s.
In terms of buckles, early on I settled on keeping a clean Davis Buckle/M1967 belt for parades, but used the M1956 belts and buckles on my LCE until the black side release buckle belts came out. They were reliable one-handed release and worked well with gloves, and I was satisfied with them until pistol belt-based Load Carriage Systems were replaced by MOLLE systems at the end of the last Century. Still, times keep changing. Recently, I became aware that AustriAlpin had developed a Cobra buckle for “duty belts” wide enough for a classic Pistol Belt. I had to grab a few and have now retrofitted a couple of my belts (10 & 11). I like it even better. This is a good place to talk about “accessorizing” tactical gear like a Pistol Belt. In terms of belts, the first thing that comes to my mind is the “Kovach Klip” or belt extender. It is often the case that a person will need to don thicker clothing items. Cold weather parkas, Wet or Dry Suits, or MOPP/JLIST CBRN garments. If wearing the thicker stuff for an extended period, it might be worthwhile to reconfigure one’s gear. If, however, it is coming on or off over a short period of time, then an extender is a quick fix.
As I recall, Kovach was an Army NCO who made the first extender bearing his name with the plastic ALICE gray green buckle (below, top left). Later versions had the black side release buckle. He and Brigade Quartermasters sold a copious quantity of these simple and very useful accessories. It seems to me that the concept is still as valid today as it was in the 80s and 90s.And it can work with any buckle that has a male and female portion. In the picture below I have some examples on the far-left side. From top to bottom, the first and second Kovachoriginals. Then, one I put together with the Cobra buckle. The first 3 are of fixed length with approximately 5 inches of webbing. The fourth version is adjustable for length. Finally, a pair of Tubes versions made by First Spear. I will talk more about using this last one later.
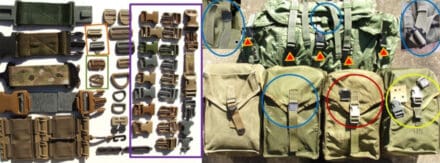
Center left of the picture above are some buckles I have found useful. I am not going to go over all of them in detail. But some bear special mention. The first are the classic metal “tabler” buckles outlined in the small amber box. Current metal tabler buckles date from the aforementioned M1967 nylon LCE. Then they were used extensively on ALICE issue items, and are still in common use today, including on the issued FLC, TAP, and Abn-TAP harnesses. It still does what it was designed to do quite well. Below that, in the small green box, is the split bar sternum strap buckle and the G-Hook. The buckles in the larger purple box are all variations of the “side release buckle.” Those shown are the most common one-inch versions. The original(top) had a straight bar female portion and a male portion with friction bar. The female portion was meant to be sewn in place and fixed. There are 10 different versions of the female and an equal number of male buckles in the purple box. Straight bars, split bars, friction bars, surface mount, and newer wavelock and split bar wavelock versions. And there are others. Many of the modern buckles can be used effectively without any sewing at all.
Most folks in the Military were first exposed to “plastic” buckles in the early 80s. The earliest use on tactical gear was driven by individuals who had been issued the ALICE rucksack (above, top right). Off post sew shops would carefully remove the alligator or tabler buckles that came with the pack and then sew on the new female portions of the buckles (red triangles). For those that do not go that far back, the first generation of ALICE packs was issued with an “alligator buckle (top left and bottom left blue circles, above). The allegator buckle was hands down the worst buckle ever fielded by the US Military. They broke easily, rusted as soon as they got wet, and required a kung fu grip to activate. Worst of all, they did not even reliably hold tension on the strap when tightened. They were quickly replaced by the more reliable tabler buckles.
But not entirely. Indeed, during the transition, some ALICE packs were fielded with a mix of alligators and tablers. However, the all tabler versions are by far the most common and, therefore, most personnel who were issued ALICE packs are most familiar with that version. Still, if you have used an ALICE, you have seen and recognize the “quirks” of the allegator buckle. Because, the Military never changed the buckles for the internal radio pocket. Even when most of us replaced the outside tablers with plastic buckles, we did not go to the extra expense of resewing the inside buckle. So, that lone allegator stayed out of sight and out of mind. Today, with split bar buckles, that is no longer an issue. So, if someone still has an allegator buckle anywhere on their ALICE pack, I strongly suggest breaking that mother off and replacing it asap.
The alligator buckles were only used on one other piece of kit that I am aware of. That is the nylon M1 General Purpose Ammunition Bag (above, bottom right). I love this bag and have spoken highly of it before. It is truly “bomb proof” kit. Double layered material on the body, and 2-inch web reinforcement all around the perimeter. Multiple D-ring attachment points so that it could be mounted or carried any number of ways. I carried the canvass version on the left for years and got a kick out of jumping it “exposed” just like WWII Paratroopers while I was in the 82nd Airborne (83-88). I did not see the nylon version until later. They were produced in the early 70s and only came with the allegator buckle. Since they were not standard issue, I presume they languished in some warehouse somewhere for years. Since rucksacks became standard issue after Vietnam, there was less perceived need. Too bad. I think a lot of people would have found them to be as useful as I did, if they had been issued one.
The only flaw was the buckle. I had to have a “standard” plastic buckle sewn on the first nylon one I found. Just like we did with the ALICE packs. When the surface mount buckle (far right) came along I was able to change them out myself – no sewing involved. It required a cardboard template (yellow circle) and a (very) hot star screwdriver or M16 cleaning rod section to make the appropriate holes. Now with split bar buckles it is even easier (red circle, above). And, yes, as soon as I took the picture above, I broke off that last annoying allegator buckle and replaced it with a split bar. I have a few M1 Bags, but they are very hard to come by today. Consequently, I would nominate the M1 Bag as a worthy candidate for an update project for some tactical gear manufacturer out there looking for something “retro made new” to reintroduce to a new generation.
Even though no one asked me to, I continue to spend time trying to make current issue gear better. I did a whole article on how I thought the Abn-TAP could be made more modular and, in my opinion, better. I am still tinkering with it. Below are my latest hacks. I had 4 web bars sewn onto the shoulders (red triangles). Two per side. This is an easy and cheap modification and allows for better wire or hydration tube management as pictured. The FLC (not shown) could benefit from a similar mod as well IMHO. The Abn-TAP harness comes with a horizontal bar on the back of the yoke, but no dedicated attachment for a hydration carrier or Modular Assault Pack (MAP). In the yellow circles, I slide two web bars into the outermost channels and put G-hooks onto a carrier so that I can readily attach and detach it. The G-hooks allow for a very quick, flat, and secure mounting option.
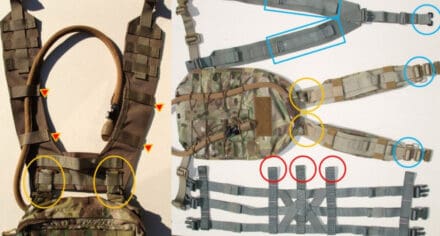
I did the same for the TAP harness on the right, but that was a more convoluted process. The back half of the TAP suspenders have no points of attachment. The harness straps are not wide enough to use the perpendicular web bar solution that works very well for the Abn-TAP. So, I added parallel one inch web bars (blue boxes, top right). That provided slots for the G-hooks to attach to (small yellow circles). Some narrow padding could also be added – locked in by the new web channels – to help mitigate neck rubbing. And, just because I do not like elastic bands, I replaced them with the split bar sternum buckles. There is no standalone split bar triglide buckle, so the sternum buckles can substitute. The US Military now uses wavelock versions of side release buckles almost exclusively on Load Carriage Harnesses (not rucksacks). Therefore, since wavelocks only allow one layer of webbing to pass through – like the tablers and allegators – there is no way to remove the female buckles on the harness in order to use standard triglides for webbing control without some “surgery” and resewing.
Still, for all the reasons I mentioned in Part 1 of this series, even my modified TAP harness still sucks. Maybe not quite as bad, but suck it does. So, I took all the scraps I had left over from this project and made something else. A Franken-harness. Bottom right is the skeletal back harness I mocked up by sacrificingthree of the TAP harnesses. The three center vertical bars have loops on the top and can be used with a Y (TAP) or H (Abn-TAP) harness equipped with split loops (top blue circle). Thosemiddle vertical bars would need to be sewn in place to give the structure some rigidity. The outboard vertical bars would be floating and could be moved in or out as required for sizing. This harness is similar to skeletal chest rigs that a couple of manufacturers sell as well as a number of skeletal cummerbunds that are out there. I think this might be the first intended to be a back panel. Something like this would at least “lock” the harnesstighter to the body of the TAP and the wearer in order to minimize any “slop” or sag in the heavier load bearing front portion. Certainly, better than the single strap does now.
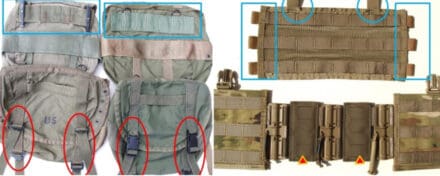
Just a few more examples. Above, top left, is an old M1956 buttpack of mine. Usually, the slide fasteners, a.k.a “ALICE clips” attach around the bellyband or center line of the pack. I wanted to drop the buttpack down and accomplished that by adding slotted webbing on the back (blue squares, top 2 examples). It put the top of the buttpack in line with the top of the web belt. That helped with both carrying a rucksack and when putting on a parachute harness. I may have invented this one. I have not ever seen anyone else with this particular modification. Has anybody? A lot of nylon aftermarket buttpacks were made after Vietnam based on the similar canvass M1961 and nylon M1967 versions of the buttpack (bottom 2 examples). Even though some of those got into the supply system they were never an official part of the ALICE LCE. Most were made with tablers (bottom left) but toward the end some were manufactured with plastic buckles (bottom right).However, in this case, I actually removed the tablers on the buttpack on the right and replaced them with split bar bucklesmyself.
On the right side, above, is the issue back panel from an Abn-TAP. I had loops sewn on the side and top of this one to allow removal of the QASM buckles that come mounted on the body and that, in turn, facilitates the use of flatter male or female split bars in the loops on the side. That frees up some real estate and moves the hard plastic buckles farther out so, hopefully, a rucksack is not riding directly on them. Below that, are the front panels from the Abn-TAP. Just another example of the Kovack concept. One or even two of the First Spear extenders (red triangles) can be used to “stretch out” the harness if needed. On the next picture, below right, is a JPC. For a plate carrier, set upwith tubes, one extender per side would be used to get the same effect without having to do a major reconfiguration of one’s gear on the fly. I like the Spiritus skeletal tubes cummerbund so I use it instead of the velcro closed cummerbund that comes with the JPC. Not very easy to tell, but under the extenders is a Velocity Systems placard. So, these substitutions were easy, but not ascheap as the simple buckle replacements.
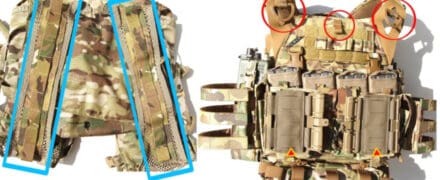
On the top of the JPC, in the outboard red circles, are two good sized D-rings I used to replace the plastic toggles (not shown) that come with the JPC. This is a modification kit that Crye offers, but the D-rings are readily available separately. I had these sewn on permanently. I was not confident on getting a good grip on the toggles with gloves on. One last thing on the JPC. Behind the center red circle is a small velcro closed admin pocket. It needed more cowbell. In this case, I added a pull tab. This is not a new idea. If you go back to the earlier ALICE picture (above), I marked the pull tab on the “map pocket” in the top flap on the pack with a small blue circle. I suggest that anytime one has a pouch or pocket with a velcro closure that is two or more inches long, a pull tab will make getting it open much easier under stress and, again, especially with gloves on.The pull tabs even help “index” the flap/velcro when closing the opening back. That is why many manufacturers routinely use pull tabs on most of their velcro closed pockets and pouches.
Finally, on the left is a RECCE Vest. It is a great piece of kit. But not perfect for my needs. I found that the mesh was bunching up on my shoulders and I was concerned that if I threw it on over a belt harness – as I intend to – the mesh might snag. So, I gave up some ventilation and had 2-inch webbing sewn on the top and bottom of both sides. To give myself the points of attachment I wanted, I had parallel 1-inch webbing loops sewn on top (blue boxes). That works for me. Certainly, none of my examples may be relevant to any readers’ specific gear issues, but the principles are sound. In conclusion, I also know that the average reader does not have a Tuff Box full of bags o’ buckles of every style and color like I do. But, neither did I when I started. After I joined the Army, I soon learned to “salvage” buckles and pieces of webbing for my professional enhancement and experimentation. If turning in something that was “unserviceable,” I routinely made it a little more unserviceableby taking off all the bits and pieces I thought might be useful later. It was not like the Army was going to remanufacture damaged tactical gear and return it to service. I suggest “recycling” the useful parts of our gear – issued or otherwise – is the most fiscally responsible and patriotic thing we can all do.
De Oppresso Liber!
LTC Terry Baldwin, US Army (Ret) served on active duty from 1975-2011 in various Infantry and Special Forces assignments. SSD is blessed to have him as both reader and contributor in this last installment of the great work he has done.
Lieutenant Colonel Baldwin’s “Hacking Tactical Gear (Part 1)” can be found here.